Change Form
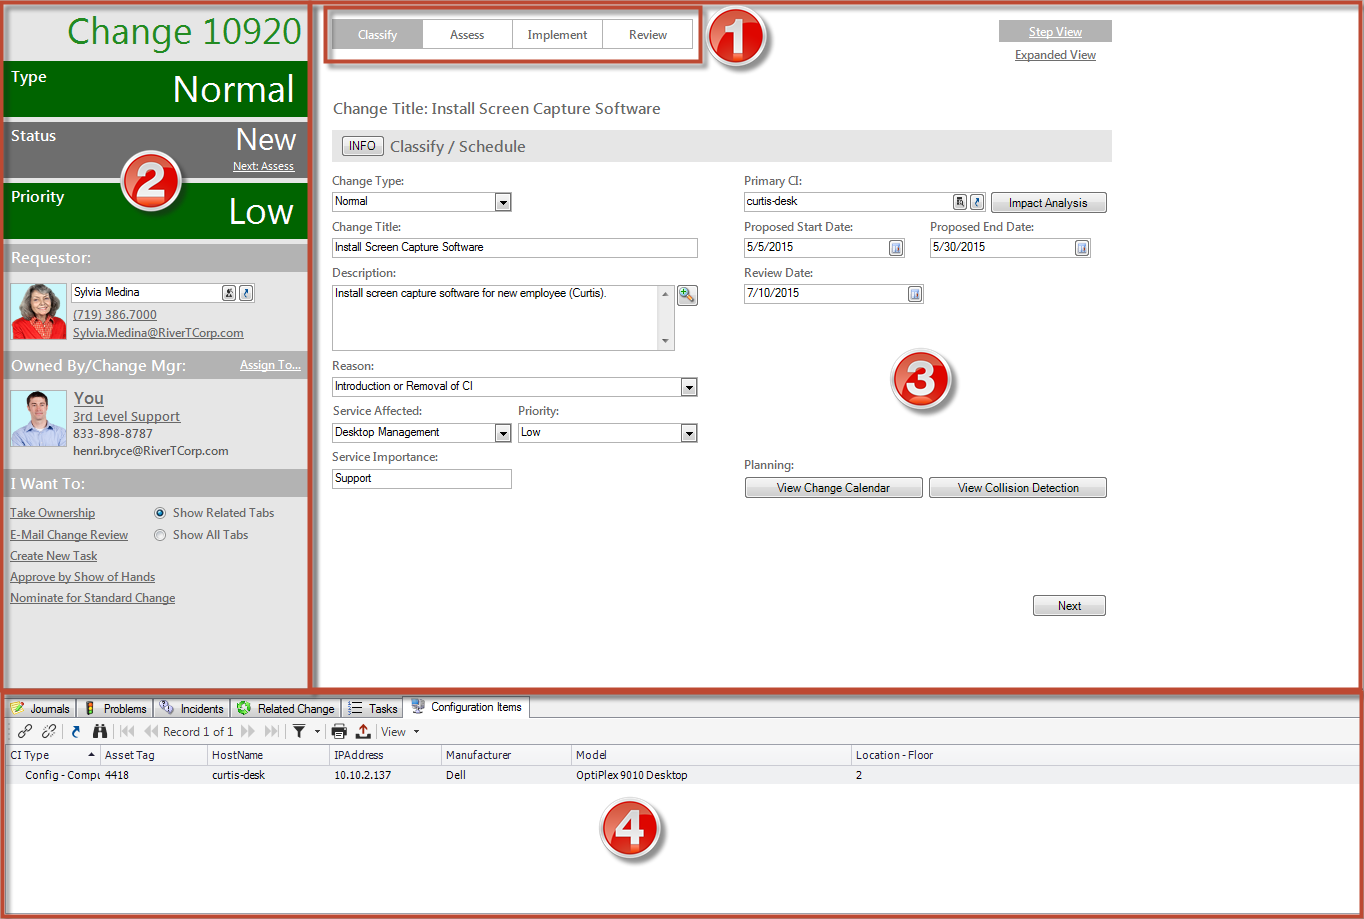
Use the Change Form to create, edit, and track Changes. The Form has four areas:
- A workflow bar tracks the Change as it progresses through the Change
workflow phases:
- Standard Change: Classify, Implement.
- Normal Change: Classify, Assess, Implement, Review.
- Emergency: Classify, Assess Implement, Review.
- The Quick Info Tile displays important at-a-glance information, such as Change ID, Change Type (Standard, Normal, or Emergency), Status bar (current status), Priority alert bar, Requestor, Ownership (Change Manager), and common operations (I Want To section).
- The Main Pane displays dynamic embedded forms as you move through the workflow. Using Normal and Emergency Changes, you can toggle between a simple Step View form and a detailed Expanded View form.
- The Arrangement dynamically displays linked records (child records)
that are related to the Change (parent record), such as Journals (to track
notes and history),
Problems, and
Incidents.
Additional tabs related to the Change are displayed as information is recorded
onto the Form.
The following table describes notable fields on the Form.
| Field | Description | Comments |
|---|---|---|
| Quick Info Tile | Important at-a-glance inFormation, such as Change ID, Type alert bar, Status alert bar, Priority alert bar, requestor information, ownership, and common operations (I Want To section). | |
| Change | Record type. | CSM automatically assigns the Record Type based on type of record created (New>Change Request). |
| ID | Unique record identifier (example: 10890). | CSM automatically assigns the ID when the Change is created. |
| Type alert bar | Type of Change (Normal, Standard, Emergency). The color green indicates a Standard or Normal Change, and the color red indicates an Emergency Change. | CSM automatically displays the appropriate Change form based on the type of Change. |
| Status alert bar | Current status of the Change as it progresses through the Change workflow. | Change statuses do not always align with Change phases. |
| Priority alert bar | The color (red/orange/green) indicates the level of priority. | Priority is defined using the Priority drop-down (Priority Matrix) in the Classify section of the Main Pane. |
| Requestor | Person who initiates the Change. | CSM automatically assigns the Change creator as the requestor, but a different requestor can be selected. |
| Requestor Name |
Name of the Customer who initiated the Change. Provide a name in the Requestor field (example: Clair), and then press <Enter> or <Tab> to locate the Customer Record. Note: Wildcards like % or * can be used with partial information. If an exact match is found, the information auto-populates the Requestor, Phone, and E-mail fields. If multiple matches are found (example: Multiple Customers named Clair), the Contact Manager opens so that the technician can select the appropriate one. |
After you select a Customer, the Photo, Phone, and E-mail fields are auto-populated with information from the Customer record. |
| Avatar | Avatar (photo or image) of the Customer who initiated the Change. |
The Avatar, Phone, and E-mail fields are auto-populated with information from the requestor's Customer Record. One-Step Action (Dial Customer Phone): Dials the Customer's phone number. One-Step Action (Follow-up E-mail): Creates a follow-up e-mail to send the Customer regarding a question or update about the Change. Allows the User to edit the e-mail before clicking Send. Attaches the e-mail to the Change History record.
|
|
E-mail address of the Customer who initiated the Change. Click the link to create an e-mail addressed to the Customer (if e-mail is configured). |
||
| Phone |
Phone number of the Customer who initiated the Change. Click the link to dial the Customer (if telephony is configured). |
|
| Owned By/Change Manager | Record owner. | |
|
User Owner -select owner- |
Name of the User owner. Click the link to first select a Team and then a User owner (User is limited by Team). Typically, the owner is the Reviewer and a member of the Support Team. |
One-Step Action (Assign to Individual):
Launches the Choose Team window, where a User can choose an Owned By Team for the record; then, launches the Choose User window, where a User can choose a Primary User from the already-selected Team. |
|
Team Owner -select team- |
Name of the owner Team. Click the link to select a Team owner. | One-Step Action (Assign to Team):
Launches the Choose Team window, where a User can choose an Owned By Team for the record. |
| Assign to | Click the link to select a User owner for the Change. The Team owner is auto-populated by the selected User owner's default Team. | One-Step Action (Assign to ANY Individual):
Launches the Choose Team window, where a User can choose an Owned By Team for the record; then, launches the Choose User window, where a User can choose a Primary User from the already-selected Team. |
| Avatar | Photo/graphic associated with the User owner (from User profile) | |
| I Want To | Common operations. | |
| Take Ownership | Click the link to make yourself (Current User) the User owner for the Change. | One-Step Action (Take Ownership):
Makes the Current User the Primary User of the record. |
| E-mail Change Review | Click the link to define and send an e-mail containing a link to the Review Questionnaire. | One-Step Action (Create Change Review): Creates a new Review Questionnaire (Supporting Object) and creates an e-mail containing a link to the review and record details (Description, Scheduled End Date, Actual End Date, etc.). |
| Main Pane | Displays detailed information about the Change, such as title, description, etc. | Fields in the Main Pane vary based on the type of Change. |
| Change Type | Type of Change. Click the drop-down and select a Change type (Normal, Standard, Emergency). | Different Change forms display based on the type of Change. |
| Change Title | Display name for the Change. | |
| Description | Description of the Change. | |
| Primary CI | CI affected by the Change. | |
| Proposed Start Date | Expected start date. Click the
Calendar Date Selector button
 to select a start date for the Change. to select a start date for the Change.
|
|
| Proposed End Date | Expected end date. Click the
Calendar Date Selector button
to select an end date for the Change.
|
|
| Impact Analysis | Displays a Configuration Map of the primary CI. Click the button to open the Configuration Map window. |