Configure CSM as a SAML Service Provider
Use the Service Provider page in the SAML Settings window to configure CSM as a SAML Provider.
To configure CSM as a SAML Service Provider:
- In the CSM Administrator window, click the Security category, and then click the Edit SAML settings task.
- Click the Service Provider page.
- Provide
CSM identity information:
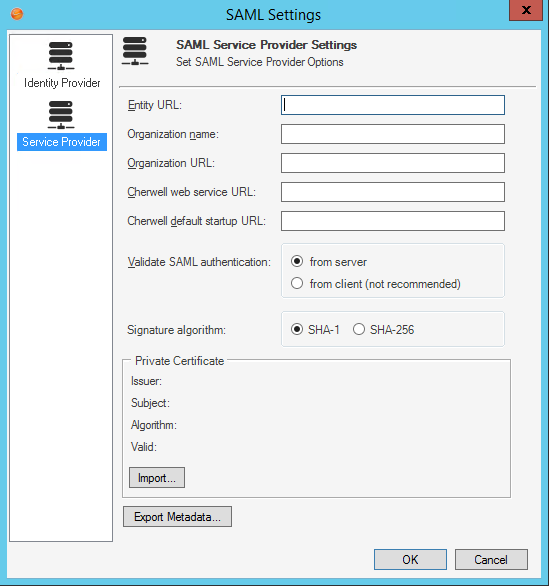
Option Description Entity URL Provide the URL that identifies the service provider. The entity and service URLs should use the same domain as specified in the signing certificates Organization name (Optional) Provide the service provider organization name, this is used only for display. Organization URL (Optional) Provide the URL of the service provider organization, this is used only for display. Cherwell Web Service URL Provide the Cherwell Web Service URL (example: https://MyServer/CherwellService). CSM default startup URL Provide the CSM Client or Portal URL for the site to be redirected to after logging in using SAML Identity-Provider initiated authentication. Validate SAML authentication After a User is successfully authenticated through SAML, CSM receives a response that the User is valid. To verify that the User valid response is itself is valid, CSM sends a request to a CSM web service to authenticate the response. Select whether the request is sent:
From Server (recommended): If CSM is locally hosted, this might require changes to the firewall configuration to allow HTTPS web communication between the Cherwell Application Server and the web server hosting the Cherwell Web Service, if on different machines.
From Client: Provide for backwards compatibility and in cases where the from server option might be incompatible with the network configuration. This is a less secure option.
Note: In most configurations, this option only impacts the behavior of the CSM Desktop Client.
Signature algorithm Select the Secure Hash Algorithm to use for signing SAML messages between CSM applications and your identity provider. SHA-1 and SHA-256 are supported; SHA-1 is the default signature algorithm. - Import the
Private Certificate: Personal Information
Exchange Format (.pfx) file containing a certificate with a private key. This
certificate must be issued by a trusted certificate authority. To import a
private certificate, click
Import and select the
.pfx file. There is a prompt to enter the
password for the file.
Note: Signing certificates are normally managed by network IT staff; IT should be knowledgeable about the procedure for obtaining new certificates. Certificates must be obtained from trusted certificate authorities (such as VeriSign, Thawte, Go Daddy, etc.). For more information, see SAML signing certificates
- Export the service provider settings to a metadata file:
Tip: Use this file later to import the service provider metadata into the identity provider.
- Click
Export Metadata.
The Export File window opens.
- Select a name and location for the metadata .xml file.
- Click
Export Metadata.