Configure the SAML Identity Provider
CSM has been tested with the following identity providers:
- Microsoft ADFS 2.0
- Shibboleth
- SSOCircle
Note: CSM most likely works with other identity providers, provided they adhere to SAML 2.0 standards.
Each identity provider uses a different procedure for integrating with CSM. The procedures in this section provide some sample guidelines on how to configure CSM with each of the three identity providers. Refer to the specific identity provider documentation for guidelines on installing and initially configuring the identity provider, and to ensure that the correct configuration steps are followed for the desired implementation.
To configure the SAML Identity Provider:
- In the CSM Administrator main window, click the Security category, and then click the Edit SAML settings task.
- Click the
Identity Provider page.
- Import the identify provider's metadata:
Note: Importing the metadata sets up most of the configuration in one step and decreases the likelihood of mistakes; however, manually enter all the data and import the signing certificate, if needed.
- Click Import Metadata.
- When prompted for a file name, select the
Service Provider's metadata .xml file (or
specify a URL provided by the identity provider.
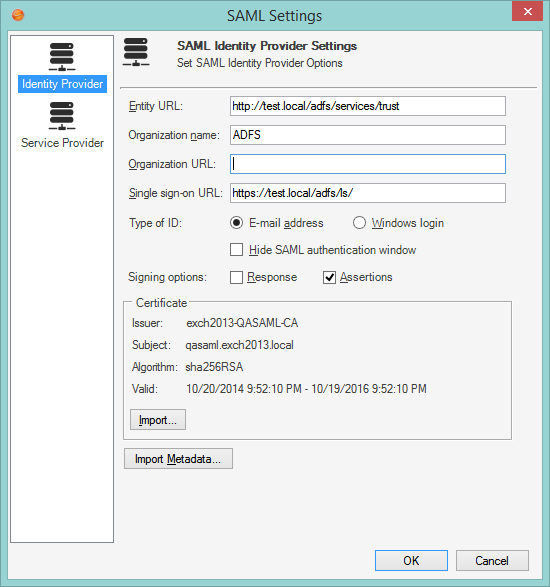
The following information is automatically imported from the metadata file (fields are auto-populated):
Entity URL A URL that uniquely identifies the identity provider. This is provided by the identity provider. Organization Name (Optional) The name of the identity provider, used only for display. Organization URL (Optional) The main URL of the identity provider, used only for display. Single-Sign-On URL The URL of the identity provider’s authentication service. This should always be a secure URL (beginning with https:). Certificate The identity provider signing certificate (a standard .cer file) is used to verify messages from the identity provider.
Note: Signing certificates are normally managed by network IT staff; IT should be knowledgeable about the procedure for obtaining new certificates. Certificates must be obtained from trusted certificate authorities (such as VeriSign, Thawte, GoDaddy, etc.). For more information, see SAML signing certificate. - Select the
Type of ID (SAML Name ID) to request from the
identity provider, either:
- E-mail Address: When using e-mail address, ensure that the E-mail Attribute is set on the E-mail Address Field of the User/Customer Business Objects (User Info and Customer-Internal). Verify that the identity provider can return the desired type of ID.
- Windows Login: For Users on Windows environments, the recommended solution is to use ADFS and Windows account names. The solution works well and requires less logging in. Using account names also avoids issues where multiple Users might share the same e-mail address. When using other identity providers, particularly those that are hosted outside the organization's network, email address might be the only solution available.
- Hide SAML authentication window: Select whether to hide (selected
check box) or display (cleared check box) the SAML authentication window used
by CSM
Desktop Client.
Note: This should be used only with ADFS and when Users are normally logged into the same network, in which case Users are never prompted to login and so the browser window might be considered an unnecessary distraction.
- Select the appropriate Signing Options to configure SAML signing certificates according to your Identity Provider's parameters. When an authentication response is returned, it may consist of many SAML assertions. Identity providers may sign the entire response, sign individual assertions, or both. For example, ADFS signs individual assertions but not entire responses. Consult documentation from your Identity Provider to determine the appropriate settings. You must select at least one option.
-
Adjust the server time allowance to allow for differences in clocks on the Identity Provider and local servers. This setting will default to 60 seconds but can be overridden by a setting in the web.config files for both Cherwell Service and the REST API. To override the default setting, specify a value in seconds in the web.config files as follows:
<add key="SAMLServerTimeAllowance" value="90" />
- If using SAML and a non-ADFS Identity Provider, you must add this
setting to the web.config file in the Cherwell Service folder. Specify the
setting under the <appSettings> section as follows:
<add key="IdpIsAdfs" value="false"/>
If you have upgraded and are using ADFS, you will not need to add the setting.