Relationship Editor
The Relationship Editor is the interface within a Blueprint in CSM Administrator that allows you to manage Business Object Relationships. Use the Relationship Editor to:
- Create Relationships, using either the The Relationship Wizard or the The Relationship Properties window.
- Edit Relationships
- Delete Relationships
Open the Relationship Editor from the Object
Manager (within a Blueprint in CSM Administrator):
- In the
CSM Administrator main window, click the
Blueprints category, and then click the
Create a
New Blueprint task.
Note: If working on a saved Blueprint, open the existing Blueprint.
The Blueprint Editor opens, showing the Object Manager in its Main Pane. The Object Manager lists the existing Business Objects.
- In the Object Manager, click a
Business Object in the Object tree, and
then click the
Edit Relationships task in the Structure area.
The Relationship Editor opens.
Tip: You can also click the Edit Relationship button
 on the
Blueprint
Editor Toolbar to open the Relationship Editor.
on the
Blueprint
Editor Toolbar to open the Relationship Editor.
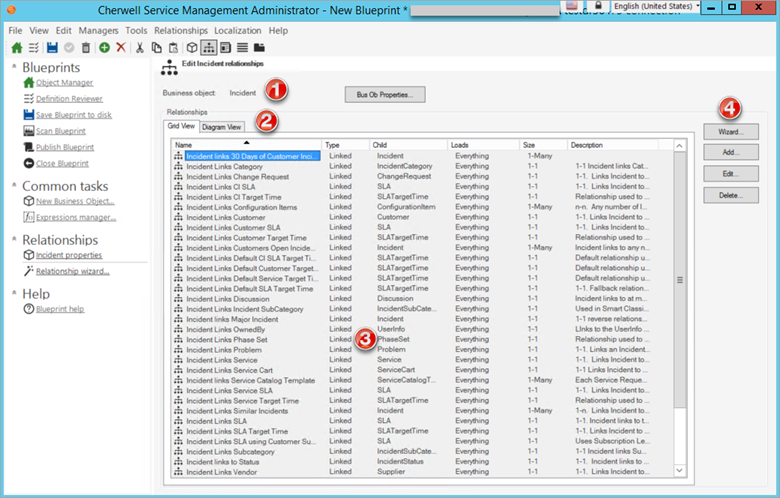
- Business Object Properties: View the Business Object that the Relationships are associated with. Select the Bus Ob Properties button to open the Business Object Properties window and easily make changes to the associated Business Object.
- Diagram View Tab: Displays an Entity Relationship Diagram view of first-level Relationships associated with the selected Business Object.
- Relationship Editor Table: By default, associated
Relationships are displayed alphabetically by name in the Grid View tab. The
following details can also be viewed in the Editor Table:
- Type: Displays whether the Business Object Relationship is a Linked or Owned Relationship.
- Child: Displays the type of Child Business Object that is associated with the Relationship. For more information about Child Business Objects and Relationships, see Define General Properties for a Relationship.
- Loads: Displays the Load settings for each Relationship. Customizing Load settings may impact system speed. For more information on customizing Load settings, see Define Advanced Properties for a Relationship.
- Size: Displays whether the Relationship is a one-to-one or a one-to-many Relationship. A one-to-one Relationship means that the Business Object links to only one instance of a Child Business Object. A one-to-many Relationship allows the Business Object to be linked to multiple instances of a Child Business Object. For more information, see Create a Relationship Using the Relationship Wizard.
- Description: Displays the description added to a Relationship.
- Relationship Editor Buttons: Use the following buttons to
easily edit existing Relationships or create a new Relationship from the Grid
View Tab:
- Wizard: Opens the Relationship Wizard with the selected Business Object properties pre-populated (example: Incident). Use the Wizard to create a new Relationship.
- Add: Opens the Relationship Properties Window, use the Window to create a new Relationship.
- Edit: Opens the Relationship Properties Window for the selected Relationship so that settings can easily be edited.
- Delete: Deletes selected Relationship.
Note: The Relationship Editor buttons are disabled in the Diagram View tab.