Incident Form
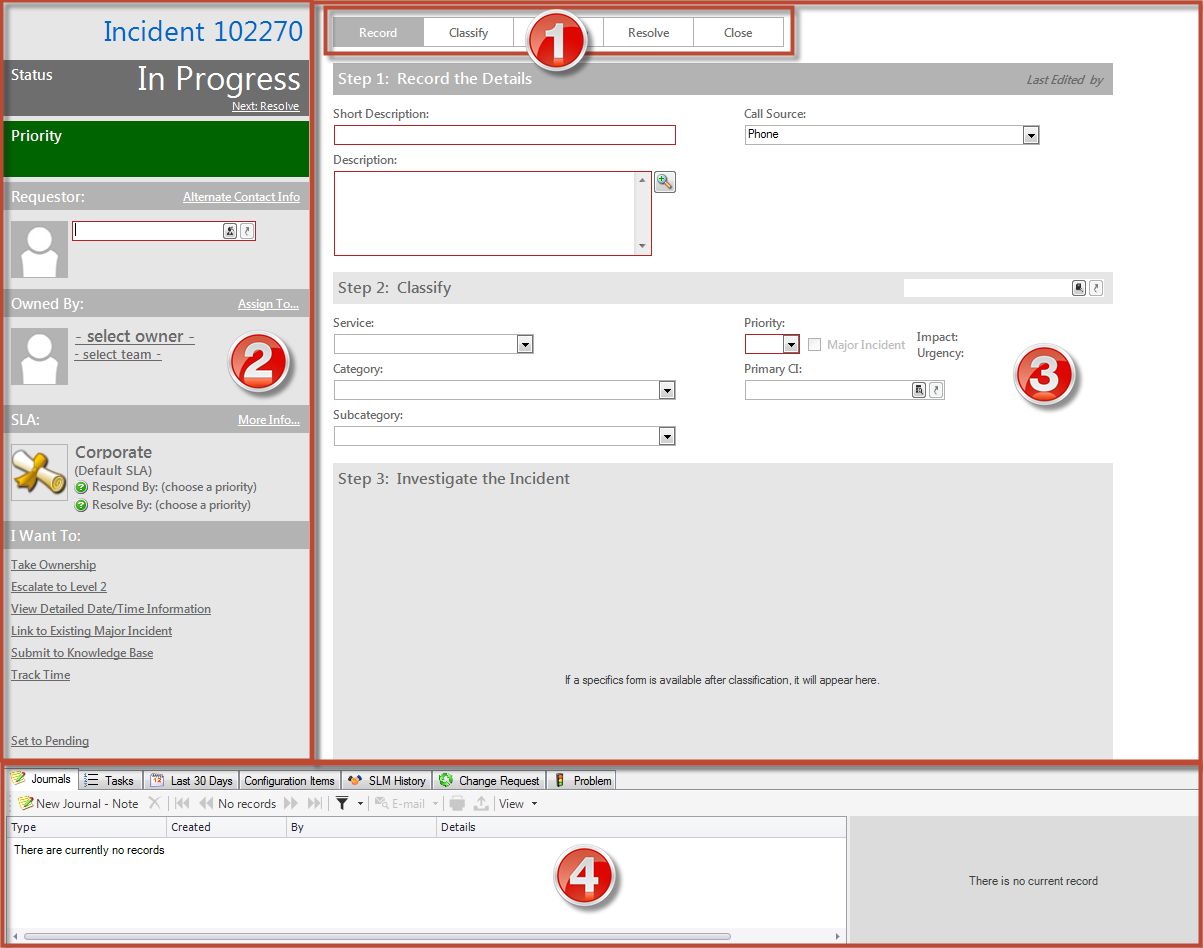
Use the Incident and Request forms to create, edit, and track Incidents/Requests. The forms are similar and are made up of four main areas:
- Workflow Bar: Tracks the Incident as it progresses through the Incident/Request workflow. Dark gray indicates the current phase.
- Quick Info Tile: Displays important at-a-glance information, such as Incident ID, requestor contact information, Status bar (current and next Status), record ownership, SLA information, and common operations (I Want To).
- Main Pane: Displays the main form fields, organized by Record, Classify, and Investigate/Fulfill steps. Specifics forms appear when relevant.
- Arrangement: Dynamically displays linked records (child records) that
are in a relationship with the Parent Incident Record.
The following table describes the fields on the form.
| Field | Description | Comments |
|---|---|---|
| Quick Info Tile | Important at-a-glance information, such as Incident ID, requestor contact information, Status bar (current and next status), record ownership, common operations (I Want To area.), and SLA information). | |
| Incident/Request | Record Type. | CSM automatically assigns the Record Type based on the type of record created (New>Incident) and its classification. |
| ID | Unique record identifier (ex: 10999). | CSM automatically assigns the ID when the Incident/Request is created. |
| Requestor | Person who initiated the Incident/Request. | |
| *Requestor Name |
Name of the Customer who initiated the Incident/Request. Provide a name in the Requestor field (ex: Max), and then press <Enter> or <Tab> to locate the Customer record. Note: Wildcards like % or * can be used with partial information. If an exact match is found, the information autopopulates the Requestor, Phone, and E-mail fields. If multiple matches are found (ex: Multiple Customers named Max), the Contact Manager opens so that the technician can select the appropriate one. Manually launch the Contact Manager by clicking the
Contact Manager button
View the Customer's Contact record by clicking the
Go To button
|
*Required After you select a Customer, the Photo, Phone, and E-mail fields are autopopulated with information from the Customer record. If the Customer is a VIP, a VIP icon appears in the Requestor area to notify you of his importance. |
| Alt. Contact Info | Alternate phone number or e-mail address of the Customer who initiated the Incident/Request. | |
| Avatar | Avatar (photo or image) of the Customer who initiated the Incident/Request. |
The Avatar, Phone, and E-mail fields are autopopulated with information from the Requestor's Customer Record. One-Step Action (Dial Customer Phone): Dials the Customer's phone number. One-Step Action (Follow-up E-mail): Creates a follow-up e-mail to send the Customer regarding a question or update about the Incident. Allows the User to edit the e-mail before clicking Send. Attaches the e-mail to the Incident History record. |
|
E-mail address of the Customer who initiated the Incident/Request. Click the link to create an e-mail addressed to the Customer (if e-mail is configured). |
||
| Phone |
Phone number of the Customer who initiated the Incident/Request. Click the link to dial the Customer (if telephony is configured). |
|
| Status Bar | Current and next status of the Incident as it progresses through the Incident workflow. | Incident statuses do not align with Incident phases. |
| Status |
Statuses include:
|
|
| Next: Status | Click the links to move the Incident/Request through the Incident/Request workflow. Actions include: | One-Step Actions (Alt 1 Step from Relationship, Alt 2 Step from Relationship, or Next
Step from Relationship):
Conditionally changes the record status to next logical status (defined by the status values in Table Management). |
|
One-Step Action (Start Work In Progress): Tracks the date/time responded and changes the Incident Status to In Progress. If ownership has not yet been assigned, assigns the Incident to the current User and the Team that User belongs to. | |
|
One-Step Action (Set Pending): Changes Incident Status from In Progress or Reopened to Pending in order to pause the SLA Clock (Stop The Clock). For Incidents in Pending Status, sets them to their previous Status using the Remove Pending Status link. | |
|
One-Step Action (Resolve Incident): Changes Incident Status from In Progress to Resolved, and then prompts the User for a Close Description and Cause Code if those fields are empty. Pops up a message if the Incident Record has open Tasks associated with it that need to be closed before the Incident is Resolved. | |
|
One-Step Action (Close Incident): Changes the Incident Status from Resolved to Closed. Prompts the User to fill in Resolution Notes and Cause Code if those fields are empty. | |
|
One-Step Action (Reopen Incident): Changes the Incident Status from Resolved to Reopened, and clears the resolution fields. Sets the Resolved Time in minutes and the Total STC Time in minutes to restart the SLA Clock. | |
| Owned By | Record owner. | |
|
User Owner -select owner- |
Name of the User owner. Click the link to first select a Team and then a User owner (User is limited by Team). Typically, the owner is the Reviewer and a member of the Support Team. |
One-Step Action (Assign to Individual):
Launches the Choose Team window, where a User can choose an Owned By Team for the record; then, launches the Choose User window, where a User can choose a Primary User from the already-selected Team. |
|
Team Owner -select team- |
Name of the Team owner. Click the link to select a Team owner. | One-Step Action (Assign to Team):
Launches the Choose Team window, where a User can choose an Owned By Team for the record. |
| Assign to | Click the link to select a User owner for the Incident. The Team owner is populated by the selected User owner's OOTB Team. | One-Step Action (Assign to ANY Individual): Prompts the User to assign the record to any CSM User (not limited by Team). Uses Owned By ID and Owned By Team fields. |
| Avatar | Photo/graphic associated with the User owner (from User Profile). | |
| Owner E-mail Address | Owner's e-mail address (from User Profile). | |
| Owner Phone Number | Owner's phone number (from User Profile). | |
| I Want To | Common operations (initiate Actions/One-Step Actions). | |
| Take Ownership | Click the link to make yourself (Current User) the User owner for the Incident. | One-Step Action (Take Ownership):
Makes the Current User the Primary User of the record. |
| View detailed date/time information | Click the link to open the Information window, where you can view current status, created date and time, creator name, and last edited date and time. Time Date/time format is MM/DD/YYYY HH:MM. | One-Step Action (Date Time Stamps Popup): Displays details for all the date/timestamps to give a historical view. |
| Link to existing Major Incident/Unlink from Major Incident | Click the link to create a relationship between the incident/Request and a Major Incident. When a Major Incident is Resolved, you can also resolve all the Incidents linked to it (see the Major Incident - Resolve Linked One-Step Action). | One-Step Action (Link or Unlink to Major Incident): Links the current Incident to an existing Major Incident specified in the User prompt. If the current Incident is already linked to a Major Incident, removes the link. |
| Submit to Knowledge Base | Click the link to create a new Knowledge Article (KA) that uses the Description, Categorization, and solution/workaround from the Incident/Request. A KA is a separate record with its own workflow. | One-Step Action (Nominate for KB): Creates a new Knowledge Article (KA) populated with the Description, Categorization, and Solution/Workaround from the Incident. |
| Track time | Click the link to create a Time Log Task to record details and time spent on a Task completed for the Incident. |
One-Step Action (Track Time Against Incident): Creates a Task time tracking entry and prompts the User for time spent and task completion details. Sets the Task Close Code to Completed.
|
| Linked to Major Incident | Click the link to open the Major Incident, when one is linked to the Incident in focus. | One-Step Action (Go to Major Incident): Navigates the User to the Major Incident, when one is linked to the Incident in focus. |
| Workflow Bar | Displays the Incident/Request workflow phases. Dark gray indicates the current phase. | Incident phases do not align with Incident statuses. |
|
Workflow phases include:
|
||
| Main Pane | ||
| Step 1: Record the Details | Record the basic details. | |
| Last Edited by... |
Date, time, and user name information is recorded the first time the form is saved, and each time the form is modified. |
|
| *Requestor | Select a Requestor/Initiator (see above). | *Required |
| *Short Description | A concise description of the Incident/Request.. | *Required |
| *Description | Description of the Incident/Request. | *Required. Full-Text field (searchable). |
| Call Source |
Detection source for the Incident/Request:
|
|
| Step 2: Classification | Classify the issue. | Classifies the record (Categorization (Incident or Request), Priority, Major Incident, and CI). Determines the Specifics Screen for capturing the appropriate details (Specifics forms). |
| Service |
Service affected by Incident/Request:
|
You can classify an Incident from top down by first selecting
a Service, then a Category, and then a Subcategory, or you can select the
three-tier combination at once by clicking the click the
Incident Subcategory Selector button
Note:
The Knowledge Button
For more information, see Service Categorization. |
| Category | Service Category that the record relates to (ex: Mobile Client). | |
| Subcategory | Service Subcategory that the KA relates to (ex: Submit Incident). | |
| Priority | Indicates the established timescales and effort to respond to and resolve an issue (Incident or Request). Priority is derived from an impact and urgency Priority Matrix. | For more information, see Priority. |
| Major Incident | When selected, indicates that the Incident/Request is considered a Major Incident (ex: a Priority 1 Incident/Request that requires a coordinated effort). | |
| Primary CI | CI affected by the Incident/Request, if any. | |
| Step 3: Investigate | ||
| Specifics forms | Specifics forms vary. | For more information, see Specifics forms. |
| Arrangement | Dynamically displays child records that are in a relationship with the Incident. | |
| Resolution Details | Displays related Resolution Detail records that are created to track the Resolution Details and possibly the Cause Code (if it is an Incident). | |
| Journals | Displays related Journal records that are created to track User notes/comments, Customer requests/comments, field and Status changes, SLM history, Queue history, and e-mail correspondence. | For more information, see Incident Journals. |
| Tasks | Displays related Tasks (Escalations, Time Entries, and Work Items). | For more information, see Incident Tasks. |
| Similar Incidents | Displays similar Incidents (if applicable) that are found through Incident Matching to determine if the Incident/Request has a known solution/workaround, is part of a larger Problem, is a duplicate, etc. | |
| Configuration Items | Displays CIs that are related to/support this Incident (ex: Primary CI). | For more information, see About CMDB. |
| SLM History | Displays related SLA/SLM records (SLA breaches, warnings, and changes in the Pending status for Stop The Clock ). | |
| Change Request | Displays Change Requests that involve this Incident. | For more information, see About Change Requests. |
| Problem | Displays Problems that involve this Incident. | For more information, see About Problems. |
| Linked Incidents | Displays related Incidents that involve this Incident. |
 .
.
 .
.
 . Click
 is visible next to the Service field when you
select a Service in the drop-down. Click the button to search the Service title
(ex: Printing) in the Knowledge Base and view Search Results in the Knowledge
Pane.
is visible next to the Service field when you
select a Service in the drop-down. Click the button to search the Service title
(ex: Printing) in the Knowledge Base and view Search Results in the Knowledge
Pane.