Configure CSM with Shibboleth
Shibboleth is a Java-based open-source SAML federation service normally installed on Linux systems, although it can also be installed on Windows. CSM provides integration with third-party identify providers, not support. For more information about the Shibboleth setup, work with a Shibboleth Administrator. Shibboleth can be configured to use different identity data stores. These instructions are for using LDAP to connect to Active Directory as the data store.
Shibboleth Diagnostics: Logs for Shibboleth are located in the Shib2IdP\logs folder in the Shibboleth installation folder, also check Tomcat logs.
To configure CSM with Shibboleth:
- Configure CSM as a SAML Service Provider (export the data to a service provider metadata file).
- Add the CSM Service Provider to Shibboleth as a relying party. For more information, see the detailed section below.
- Configure Shibboleth as a SAML Identity Provider (import the
Shibboleth Identity Provider metadata file into
CSM):
- Open the SAML Settings Identity Provider page (CSM Administrator>Security>Edit SAML settings>Identity Provider).
- Click the
Import Metadata button.
The Select Metadata File Location window opens.
- Import the Shibboleth Identity Provider metadata file (ex: Idp-metadata.xml in the metadata folder; the name used in the installation might be different). Typically, in C:\Program Files (x86)\Internet2\Shib2Idp/metadata).
Add CSM Service Provider to Shibboleth as a Relying Party
- Copy the CSM Service Provider metadata file exported (when CSM was configured as a service provider) to the Shibboleth metadata folder (typically, C:\Program Files (x86)\Internet2\Shib2Idp/metadata).
- Edit the configuration file
Relying-party.xml located in the
Shibboleth configuration folder (C:\Program Files
(x86)\Internet2\Shib2Idp\conf\relying-party.xml). In the
Metadata Configuration section,
add an entry for
CSM as shown below (replacing "sp-cherwell-metadata.xml" with the
name of the metadata file).

- To setup Shibboleth to use LDAP for authentication, edit the file
login.config and create a configuration
for LDAP based on the requirements (refer to the Shibboleth documentation for
details – one possible example is shown below).
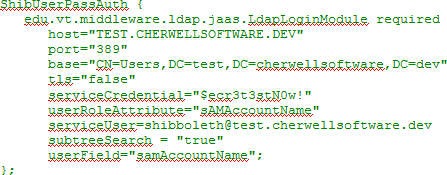 Note: When using LDAP, Users should never include the domain name with their user name (in the form domain\user) when entering User information in the Shibboleth login prompt because the domain information is already specified in the LDAP configuration.
 - To specify what should be returned for the SAML Name ID, edit the
file
Attribute-filter.xml:
- To return e-mail address, add the following attribute rule:

- To return Windows login, add the following attribute rule:
 Note: If it has been configured to return Windows login, Shibboleth only returns the User’s login name and does not include the domain name. For example, instead of returning adomin\auser, Shibboleth returns only auser.
- To return e-mail address, add the following attribute rule:
- Edit the file
Attribute-resolver.xml:
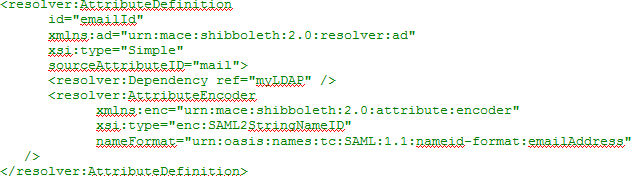
- If configuring to use e-mail address as the Name ID, in the
Attribute Definitions sections, under
Name Identifier related attributes, add the following
entry:
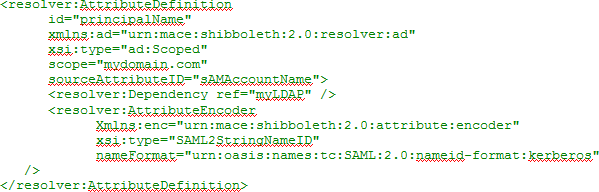
- If configuring to use Windows login as the Name ID, in the
Attribute Definitions sections, under Name Identifier
related attributes, add the following entry:
- If configuring to use e-mail address as the Name ID, in the
Attribute Definitions sections, under
Name Identifier related attributes, add the following
entry:
- Edit the
Shibboleth Identity Provider metadata
file (ex: Idp-metadata.xml in the metadata folder; the name used in your
installation might be different):
- Find the existing <NameIDFormat> elements in the
<IDPSSODescriptor> element and add the one of the following entries:
- If using e-mail address as the Name ID:
<NameIDFormat>urn:oasis:names:tc:SAML:1.1:nameid-format:emailAddress</NameIDFormat>
- If using Windows login as the Name ID:
<NameIDFormat>urn:oasis:names:tc:SAML:2.0:nameid-format:kerberos </NameIDFormat>
- If using e-mail address as the Name ID:
- Also, provide the above entry in the
"<AttributeAuthorityDescriptor> " element.
Tip: Copy this metadata file and use it to import the identity provider information into the CSM identity provider configuration.
- Find the existing <NameIDFormat> elements in the
<IDPSSODescriptor> element and add the one of the following entries:
- Restart Shibboleth through the Tomcat Manager web page (for a typical installation, browse to the URL localhost:8080, and then select Tomcat Manager. Provide the manager login ID and password, and then find the Shibboleth Identity Provider application and click Stop, and then Start.