Create a Mobile Form
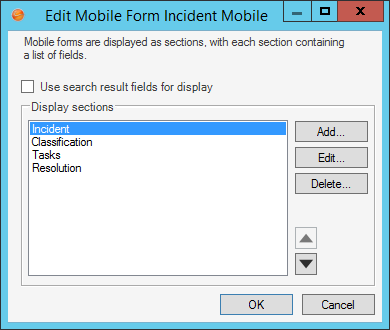
Use the Edit Mobile Form window (within the Blueprint Object Manager) to create a Mobile Form. When you create a Mobile Form, you define:
- Which sections to display on the Mobile Form.
- Which Fields to list under each section.
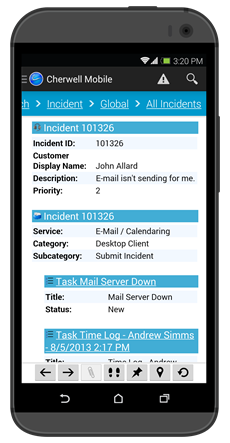
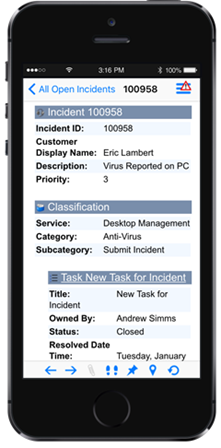
Android iOS
Good to know:
- A Mobile Form is available on a mobile device only if its Business Object is selected to be available in Cherwell Mobile (availability is defined as part of the Cherwell Mobile settings).
- A Mobile Form can include related Fields (Fields from Business
Objects in a defined Relationship with the selected Business Object). For
example, Incident can contain Fields from CIs, Journals, or Tasks):
- 1-1 Relationship Fields (ex: CI Fields) are listed under a Relationship node in the Available Fields list, and can be included in any section.
- 1-Many Relationship Fields (ex: Journal and Task Fields) must be kept together under a dedicated section.
To create a Mobile Form:
- In the
CSM Administrator main window, click the
Blueprints category, and then click the
Create a New
Blueprint task.
Note: If working on a saved Blueprint, open the existing Blueprint.
The Blueprint Editor opens, showing the Object Manager in its Main Pane. The Object Manager lists the existing Business Objects.
- Click a Business Object (ex: Incident).
- Click
Edit Mobile Form.
- (Optional) Use Search Result Fields for Display: Select this check box to display the default Search Results Fields defined in a Business Object's properties. If you select this check box, you do NOT have the option to define a customer list of sections and Fields to display.
- Define which sections to display on the Mobile Form:
- Click
Add to add a new section to the form.
Tip: Click Edit to edit a selected section. Click Delete to remove the selected item from the list. Use the Up/Down arrows to change the order in which the sections appear on the Mobile Form.
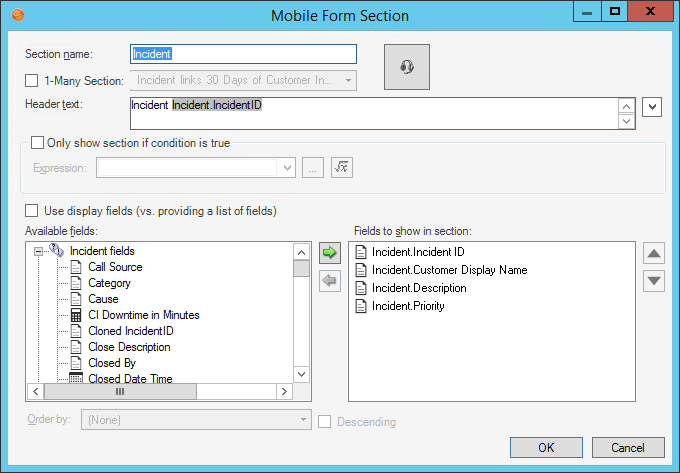
- Define general properties for the section:
- Section Name: Provide a name to use within CSM.
- 1-Many Section: See the following procedure for more information.
- Header Text: Provide the
text
to display in the section header. (This is what mobile
Users see). You can optionally include:
- Dynamic Values: Click the
Selector button
 (or right-click in the text box) to access
a menu of Tokens (ex: Fields, System Functions, Prompts, Expressions, Stored
Values, Metrics, and Counters). Then, select/build your Token. For example,
include the Record ID in the section header (ex: Incident 000100).
(or right-click in the text box) to access
a menu of Tokens (ex: Fields, System Functions, Prompts, Expressions, Stored
Values, Metrics, and Counters). Then, select/build your Token. For example,
include the Record ID in the section header (ex: Incident 000100).
- Image:
Click the Image button to open the Image Manager, and then select an existing image or import a new image to represent the item in the UI.
- Dynamic Values: Click the
Selector button
- Only Show Section if Condition is True: Select this check box
to conditionally display the section on the Mobile Form. Then, define the
condition, using either:
- Stored Expression: Click the
Ellipses button
 to open the Expression Manager, and then
select an existing stored Expression or
create a
new stored Expression. Stored Expressions can be reused in numerous places in
CSM.
to open the Expression Manager, and then
select an existing stored Expression or
create a
new stored Expression. Stored Expressions can be reused in numerous places in
CSM.
- Custom Expression: Click the
Custom Expression button
 to open the Custom Expression Builder, and
then create a custom Expression specifically for this scenario.
to open the Custom Expression Builder, and
then create a custom Expression specifically for this scenario.
- Stored Expression: Click the
Ellipses button
- Click
Add to add a new section to the form.
- Define which Fields to list under each section:
- In the Available Fields area, select the Fields you want to add
to the section by moving them to the Fields to Show in Section box:
- Use the Left/Right arrows to move Fields from/to the Fields to Show in Section box.
- Use the
Up/Down
arrows to order the Fields in the section (first through
last).
Tip: You can also add and remove Fields by clicking-and-dragging.
- In the Available Fields area, select the Fields you want to add
to the section by moving them to the Fields to Show in Section box:
-
Click OK.
To add a Field from a 1-to-Many Relationship:
- Select the 1-Many Section check box.
- Select a
1-Many Relationship
in the drop-down.
The Fields from the related Business Object appear in the Available Fields list (ex: Incident Links Task).
- In the Available Fields area, select the Fields you want to add to the section by moving them to the Fields to Show in Section box.
- Select a list order for the records in the section (first through
last):
Note: These options are available only if you selected the 1-Many Section check box because 1-Many Relationships might have multiple records (ex: Multiple Tasks related to one Incident).
- Order by: In the drop-down, select the Field to use to order multiple records when displayed in a list (ex: Closed Date Time will list Tasks in the order in which they were closed, either first closed (ascending) or last closed (descending)).
- Descending: Select this check box to order records in descending order, largest to smallest (10-1). Clear the check box to order the records in descending order, lowest to highest (Z-A).
-
Click OK.