Define mApp Solution Properties
Use the mApp Solution properties window (accessed from within the mApp Editor) to define the following:
- General properties:
- Name and description: Specific name and description for the mApp Solution.
- (Optional) Image: Image to represent the mApp Solution.
- Created by: Name of mApp Solution creator (individual or organization).
- (Optional) Details URL: Site that contains detailed information about the mApp Solution.
- (Optional) Features: Definitions grouped together into subsections of functionality.
Good to know:
- General properties are displayed in the Apply mApp Wizard when system administrators apply a mApp Solution to a CSM system, and in the Installed mApp Solutions window when Users view the mApp Solutions that have been installed in their systems.
- You must define at least general properties in order for the mApp Solution to be considered ready for distribution.
- If you have Globalization and multiple cultures enabled for your system and translations that impact your mApp Solution have been applied, you must define mApp Solution properties for each culture. For more information, see Applying Translations to mApps.
- Business Object and CSM Item definitions can be grouped together into Features (subsections of functionality) using mApp Solution conditions. Features can then be applied (or not) as a whole in the Apply mApp Wizard.
To define mApp Solution properties:
- Open the mApp Editor
- From the mApp Editor menu bar, click File>mApp Properties.
- Click the
General Properties page.
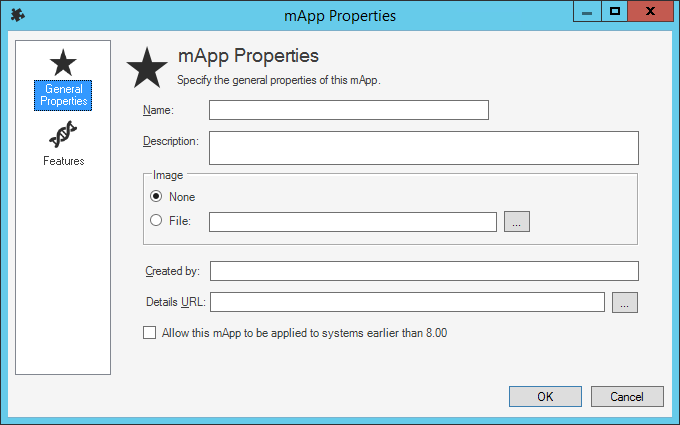
- Define general properties for the
mApp Solution:
- Name: Provide a display name to use for the mApp Solution.
- Description: Provide a description of the mApp Solution. This should be as detailed as possible, as it is displayed in the Apply mApp Wizard.
- Image: Select an
image to associate with the
mApp Solution.
- None: Select this radio button to not associate an image with the mApp Solution.
- File: Select this radio button to use an image for the
mApp Solution. Then, click the
Ellipses button
 to browse to the location of the image file,
select the file, and click
Open.
to browse to the location of the image file,
select the file, and click
Open.
- Created by: Provide the name of the organization or individual who created the mApp Solution.
- Details URL: If detailed information about the
mApp Solution is available on a website, provide the
URL here. Then, click the
Ellipses button
to navigate to the site (and ensure the URL is
correct).
- Allow this
mApp Solution to be applied to systems earlier than [CSM version]: Select this check box to allow Users to apply the
mApp Solution to
CSM systems that are older than the version from which the
mApp Solution was created. In the
Apply mApp Wizard,
Users who apply a
mApp Solution created from a
CSM system later than their current version are allowed to apply the
mApp Solution, but with a warning that all functionality in the
mApp Solution might not behave as expected. If this check box is not selected,
theApply mApp Wizard
displays a message that Users must upgrade their
CSM systems to the same version as the
mApp Solution before they can apply it.
Note: When you select this check box for a mApp Solution created in CSM version 5.11 or later, you will receive a warning message that CSM versions below 5.11 do not check for a minimum version before applying a mApp Solution.
- Click the
Features page.
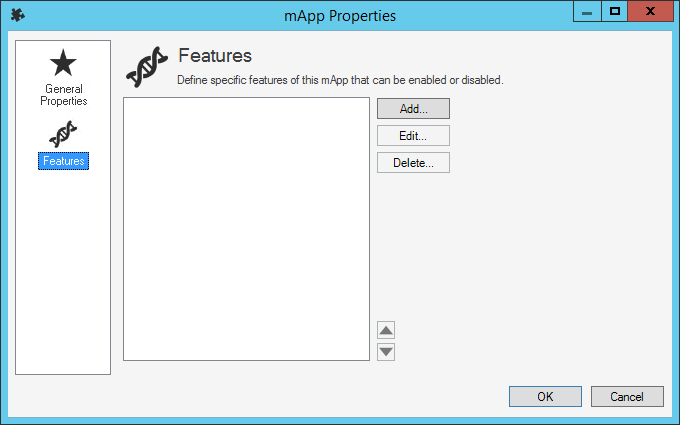
- (Optional) Define
mApp Solution Features:
- Click
Add to add a new Feature.
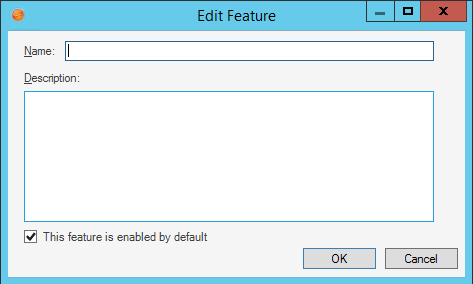
- Define general properties for the Feature:
- Name: Provide a name for the Feature.
- Description: Provide a description of the Feature. This is the text that explains the Feature to the administrator applying the mApp Solution to his system, so ensure that the description is clear.
- This Feature is enabled by default: Select this check box to include the mApp Solution Feature by default when the mApp Solution is applied to a CSM system using the Apply mApp Wizard.
-
Click OK.
- Click
Add to add a new Feature.
-
Click OK.
- Prepare the mApp Solution for Distribution (File>Prepare mApp Solution for distribution), or save the mApp Solution (File>Save mApp Solution to Disk) to continue making other changes.