Apply a mApp Solution
The Apply mApp Wizard (accessed from within the mApp Editor) is a specialized tool that walks you through the process of applying a mApp Solution to a CSM system.
Use the Apply mApp Wizard to select how to merge each definition into the target system. When you apply a mApp Solution, you can define:
- Interaction Level: How much you want the wizard to decide automatically.
- Merge actions: How you want each Business Object (along with its associated Fields, Relationships, Forms, Grids, and Form Arrangements) and CSM Item to be merged into the target system.
- Target objects/items: Which existing items to overwrite in the target system. You can also select to have a new item created for a mApp Solution definition.
Good to know:
- If the mApp Solution includes definitions that have history records, a list of additional designers is shown on the introductory page of theApply mApp Wizard. Each entry includes the mApp Solution creator’s personal and/or company name as well as the most recent creation date/time.
- The merge actions displayed in the wizard were selected when the mApp Solution was created. If you select a high level of interaction with the wizard (the Ask me about everything option), you can change the merge actions. For example, if you do not want to overwrite or change a definition, you can set the merge action to Don't Change in the wizard.
- The target objects/items displayed in the wizard are what the wizard detects in the target system as exact (or close) matches to the mApp Solution definitions. An exact match means that the wizard found a target object/item with the same record ID or exactly the same name as the definition in the mApp Solution. If you select a high level of interaction with the wizard (the Ask me about everything option), you can change the target objects/items.
- If you select a low level of interaction with the wizard, the wizard assumes you want to use the merge actions selected when the mApp Solution was created and the target objects/items it detects as exact matches in the target system. It only asks for input if an area requires clarification.
- The wizard asks you about objects and items in order of importance (determined by the mApp Solution creator). Business Object Views are always asked about first, followed by Group Objects (Group Leaders, and then Group Members), and then the remaining objects and items in order of importance.
- After you complete the wizard, you can open a Blueprint to preview the changes the mApp Solution will make to your system (recommended) or attempt to directly publish the changes. If you open a Blueprint, you can then scan the Blueprint and view Blueprint changes before publishing it.
- It is recommended that you first apply a
mApp Solution against a test system before applying it to your live system.
Note: The following procedure assumes a high level of interaction (Ask me about everything). The pages you see in the wizard (and their order) might differ from the following procedure, as they depend on what is included in the mApp Solution, the importance level of each object and item, and the level of User interaction you select.
To apply a mApp Solution to a system:
- In the CSM Administrator main window, click the mApps category, and then click the Apply a mApp task.
- Select a
mApp Solution to apply to the target system, and then click
Open.
The Apply mApp Wizard opens, displaying the properties defined for the mApp Solution.
Tip: If available, click the More Information link to navigate to a website that contains detailed information about the mApp Solution.
- Click Yes to accept the terms of the license agreement, and then click Next.
- On the Localization page:
- If you are applying a mApp Solution created in CSM 9.2.0 or later, review the cultures for translations included in the mApp Solution. If Globalization is enabled for your system and you have enabled the cultures listed for the mApp Solution, translated strings are shown to Users of the cultures included in the mApp Solution.
- If you are applying a mApp Solution created before CSM 9.2.0, select the target culture for the mApp Solution. You must perform this task even if Globalization is not enabled for your system.
For more information, see Applying Translations to mApps.
- Select a level of User Interaction (how automatic the merge process
should be):
Note: No matter which interaction level you select, you will have the option to see a summary of all changes before anything is actually modified in the target system.
- Ask me about every decision: Select this radio button to have the wizard ask how you want to apply every object and item that is included in the mApp Solution.
- Make reasonable decisions, but ask me if you are unsure (default): Select this radio button to make the apply mApp Solution process partially automated (you will be asked about any areas that require clarification). If the wizard does not need to ask you anything, you will be directed to the summary page.
- Don't ask me unless absolutely necessary: Select this radio button to make the apply mApp Solution process almost fully automated (you will only be asked about areas that absolutely require your interaction). If the wizard does not need to ask you anything, you will be directed to the summary page.
- Select the Features to apply to the target system:
Note: This page only applies if the mApp Solution includes Features. There is a page for each Feature in the mApp Solution.
- Enabled: Select this check box to apply a mApp Solution Feature with all of its associated definitions to the target system. If you clear this check box, the Feature will not be applied to the target system (you will not receive any further prompting about the Feature or any of its associated definitions). If the mApp Solution creator included a Feature by default, this check box is automatically selected.
- Select a merge action and target View:
Note: This page only applies if the mApp Solution contains custom Business Object Views, or Business Objects or other definitions that are contained in custom Business Object Views.
- Merge Actions: These are the merge actions the
mApp Solution creator defined for each View. To change the merge action for a
View, select an option in the Merge Action column's drop-down:
- Import/Overwrite: Imports/overwrites the View in the target system.
- Don't Change: Leaves the View in the target system unchanged.
- Target View: If the
mApp Solution contains a new View, the default option is
Treat as new. If an exact or close match is found in the
target system, it is automatically selected as the target View. To change the
target View, select an option in the Target Item's column drop-down:
- Existing View: The existing Views in the target system are listed in the drop-down. Select one to overwrite it with the View in the mApp Solution.
- (Treat as new): Select this option to create a new View (must have a unique name).
- Merge Actions: These are the merge actions the
mApp Solution creator defined for each View. To change the merge action for a
View, select an option in the Merge Action column's drop-down:
- Select a merge action and target Business Object:
Note: This page only applies if the mApp Solution includes Business Objects. If it includes Group objects, you will be asked about those first (Group Leaders, and then Group Members). If it includes a Group Member without a Group Leader, you will be asked to select or create a Group Leader.
- Select [Business Object Name] Business Object (best match): If an
exact Business Object match is found in the target system, select this radio
button to have the Business Object definition in the
mApp Solution imported into this object.
Tip: Click the information icon to view detailed information about the best match.
- Select a different existing object: If an exact match is not
found, or to select a different object in the target system, select this radio
button to select an existing object to import the
mApp Solution object into.
- Select from List: If objects with names similar to the mApp Solution object are found in the target system, they are listed on the page. Select an object in the list.
- Select Other Object: Click this button to open a separate window containing a list of all objects in the target system. Select an object from the list.
- Create a New Object: Select this radio button to have the mApp Solution create a new object in the target system.
- Skip this Object: Select this radio button to skip importing this
object in the target system.
Note: If you skip the object, related/dependent objects and associated definitions (Relationships, Fields, Forms, etc.) will also be excluded from the import, and the wizard will not ask you about them.
- Select [Business Object Name] Business Object (best match): If an
exact Business Object match is found in the target system, select this radio
button to have the Business Object definition in the
mApp Solution imported into this object.
- Select merge actions for the object's merge areas: These are the
merge actions the
mApp Solution creator defined for each mergeable area in the object. To change the
merge action for an area, select an option in the Merge Action column's
drop-downs:
- Overwrite: Overwrites the definition in the target system.
- Don't Change: Leaves the definition in the target system unchanged.
- Select merge actions and target items for the object's child items
(Fields, indexes, and Relationships associated with the object):
Note: This page does not apply if the mApp Solution is creating a new object, or if the entire Business Object will be overwritten.
- Merge Actions: These are the merge actions the
mApp Solution creator defined for each child item in the object. To change the
merge action for an item, select an option in the Merge Action column's
drop-downs:
- Overwrite: Overwrites the definition in the target system.
- Merge: Merges the Field's properties with the target Field's existing properties.
- Don't Change: Leaves the definition in the target system unchanged.
- Target item: If an exact match is found in the target system, it
is listed in this column. To change the target item, select an option in the
Target column's drop-downs:
- Item with similar name: If the target system contains items with names similar to the ones in the mApp Solution, they are listed in the drop-down. Select an item in the list.
- (Treat as new): Select this option to create a new item (must have a unique name).
- (More...): Select this option to open a separate window
containing a list of all items of a particular type (ex: Fields) in the
Business Object.
Note: If you select Treat as new (for this and any subsequent pages) and do not define a unique name, or if a mApp Solution item is found to have the same name as an item in the target system, the wizard will ask you to resolve naming conflicts.
- Merge Actions: These are the merge actions the
mApp Solution creator defined for each child item in the object. To change the
merge action for an item, select an option in the Merge Action column's
drop-downs:
- Select options for displayable items associated with the object
(Forms, Grids, Form Arrangement, etc.). These are the merge actions the
mApp Solution creator defined for each displayable item in the object. To change
the merge action for an item, select an option in the Merge Action column's
drop-downs:
- Overwrite: Overwrites the definition with the same ID in the target system.
- (Treat as new): Creates a new item in the target system (must have a unique name).
- Don't Change: Leaves the definition in the target system
unchanged.
Note: For Form Arrangements, you also have the option to Merge the mApp Solution definition with the one in the target system. This means that the Tabs in the mApp Solution Form Arrangement will be merged with the existing Tabs in the target Form Arrangement, allowing you to add Tabs to the existing Form Arrangement without entirely overwriting it. For more information, see Configure Merge Actions for Form Arrangements and Tabs.
- Select a merge action and target object for removal.
Note: This page only applies if the mApp Solution is removing a Business Object.
- Select [Business Object Name] Business Object (best match): If an
exact Business Object match is found in the target system, select this radio
button to have it removed from the target system.
Tip: Click the information icon to view detailed information about the best match.
- Select a different existing object: If an exact match is not
found, or to use a different object in the target system, select this radio
button to select an object to remove from the.target system.
- Select from List: If objects with names similar to the mApp Solution object are found in the target system, they are listed on the page. Select an object from the list.
- Select Other Object: Click this button to open a separate window containing a list of all objects in the target system. Select an object from the list.
- Skip this Object: Click this radio button to skip removing this object from the target system.
- Select [Business Object Name] Business Object (best match): If an
exact Business Object match is found in the target system, select this radio
button to have it removed from the target system.
- Select merge actions and target items for
CSM Items included in the
mApp Solution.
- Merge Action: This column shows the merge actions the
mApp Solution creator defined for each item. To change the merge action for an
item, select an option in the Merge Action column's drop-down:
- Overwrite: Overwrites the definition in the target system.
- Don't Change: Leaves the definition in the target system unchanged.
- Target item: If an exact match is found in the target system, it
is listed in this column. To change the target item, select an option in the
Target Item's column drop-down:
- Item with similar name: If the target system contains items with names similar to the ones in the mApp Solution, they are listed in the drop-down.
- (Treat as new): Select this option to create a new item (must have a unique name).
- (More...): Select this option to open the appropriate CSM Item Manager and select another item.
- Merge Action: This column shows the merge actions the
mApp Solution creator defined for each item. To change the merge action for an
item, select an option in the Merge Action column's drop-down:
- Select merge actions and target items for the
One-Step Actions included in the
mApp Solution.
Note: This page only applies if the mApp Solution includes One-Step Actions.
- Merge Actions: These are the merge actions the
mApp Solution creator defined for each
One-Step Action. To change the merge action for a
One-Step Action, select an option in the Merge Action column's drop-down:
- Overwrite: Overwrites the definition in the target system.
- Don't Change: Leaves the definition in the target system unchanged.
- Target item: If an exact match is found in the target system, it
is listed in this column. To change the target item, select an option in the
Target Item column's drop-down:
- Item with similar name: If the target system contains items with names similar to the ones in the mApp Solution, they are listed in the drop-down.
- (Treat as new): Select this option to create a new item (must have a unique name).
- (More...): Select this option to open the One-Step Action Manager and select a different One-Step Action.
- Merge Actions: These are the merge actions the
mApp Solution creator defined for each
One-Step Action. To change the merge action for a
One-Step Action, select an option in the Merge Action column's drop-down:
- Select merge actions and target items for miscellaneous items
included in the
mApp Solution (ex: Dashboards, Stored Searches, Stored Values, external
connections, etc.).
- Merge Actions: These are the merge actions the
mApp Solution creator defined for each item. To change the merge action for an
item, select an option fin the Merge Action column's drop-down:
- Overwrite: Overwrites the definition in the target system.
- Don't Change: Leaves the definition in the target system unchanged.
- Target item: If an exact match is found in the target system, it
is listed in this column. To change the target item, select an option in the
Target Item column's drop-down:
- Item with similar name: If the target system contains items with names similar to the ones in the mApp Solution, they are listed in the drop-down.
- (Treat as new): Select this option to create a new item (must have a unique name).
- (More...): Select this option to open a separate window
containing a list of all items of a particular type.
- Merge Actions: These are the merge actions the
mApp Solution creator defined for each item. To change the merge action for an
item, select an option fin the Merge Action column's drop-down:
- Provide a
value for the Stored Value.
Note: This page only applies if the mApp Solution includes Stored Values that prompt Users to provide values. If you do not specify a value, the default value for the Stored Value is used.
- Click
Edit External Connection to open the External
Connection Wizard and
define
settings for the external connection.
Note: This page only applies if the mApp Solution includes external connections that prompt Users to specify their own external connection settings.
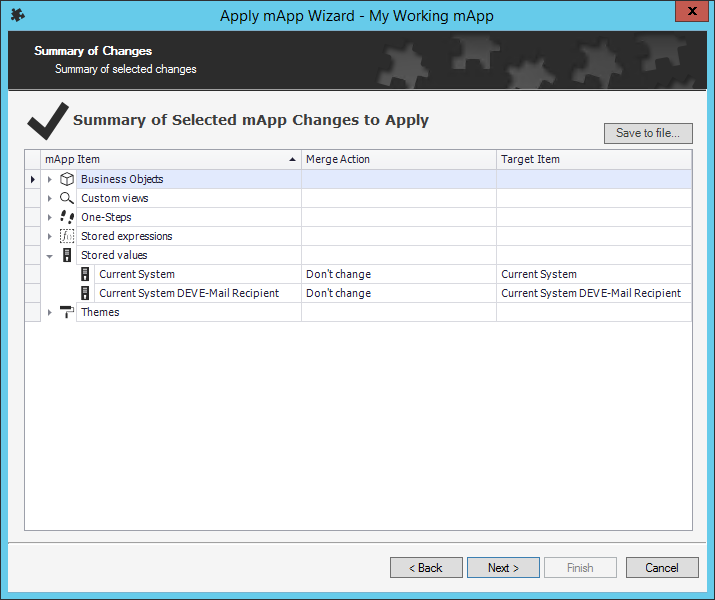
- Review the Summary page.
- Save to File: Click this button to open the Choose Export File
window, and then provide a location, file name, and output format (.csv, .html,
.htm, .txt, .rtf, .xml) for exporting the summary of
mApp Solution definitions that will be applied to the target system.
- Save to File: Click this button to open the Choose Export File
window, and then provide a location, file name, and output format (.csv, .html,
.htm, .txt, .rtf, .xml) for exporting the summary of
mApp Solution definitions that will be applied to the target system.
- Define final options (what to do after the
mApp Solution is applied to the target system):
- (Recommended) Open a Blueprint so I can preview the changes:
Select this radio button to open a Blueprint that allows you to see the changes
the
mApp Solution will make to the target system.
Important: If you select this option, you will then need to publish the Blueprint to commit the changes to the target system.
- Attempt to publish the changes directly: Select this radio button to immediately publish the Blueprint of mApp Solution changes directly to the target system without previewing it first.
- (Recommended) Open a Blueprint so I can preview the changes:
Select this radio button to open a Blueprint that allows you to see the changes
the
mApp Solution will make to the target system.
-
Click Finish.
The merge process runs and generates a Blueprint. Depending on the option selected previously, the Blueprint either:- Opens and allows you to view the mApp Solution changes.
- Immediately attempts to publish to the target system.