Map the CSM Customer Object to a Directory Service
After the General properties window is complete, Customers need to be mapped to the CSM Business Object. Use the LDAP Mapping Wizard to define:
- Directory services.
- Group information.
- Business Objects to use LDAP data.
- Fields to map to LDAP attributes.
To map a CSM Business Object to Directory Service objects:
- In a newly created Blueprint, go to the Object Manager.
- Select the Customer-Internal Business Object. Under Structure, click Map to Active Directory to open the LDAP Mapping Wizard.
-
Click Next.
- Select the LDAP directory service to use for the mapping, and then click Next.
- (This step is only shown if mapping a New Object) Select if the new
LDAP Business Object is part of a group:
- Not a Member of a Group: The Business Object is not a member of a group.
- Group Leader: The Business Object is a group leader. A group leader is an object that has other Business Objects as its children and holds the common fields shared by the children Business Objects.
- Member of Group: The association to a group. When it is selected, the drop-down enables. Select an item.
- Group Members: Click a list item to select the group members (only one item can be selected).
- Set up the
CSM Business Object to use directory service data:
- Cherwell Service Management Business Object: Provide a name for the CSM Business Object. This Autopopulates with the Object selected in the Blueprint.
- Directory Service object: Scroll down and select User.
- Reload Schema button: Click the Reload Schema button to reload the Active Directory objects. There is a warning that this function can take a while.
- Additional Filters on User: The following Out-of-the-Box (OOTB)
filters are in place. The filters are applied to filter out the records
returned.
- ObjectCategory=Person: Ensures that computers are not included along with people in the records returned.
- User accounts that are not disabled: Ensures that disabled User accounts are not included in the records returned.
To add additional filters, click the Add button.
Note: IMPORTANT: Be sure to map the Field that holds the User ID of each User. In Active Directory, this is usually SAMAccountName. This Field is needed to synchronize when a User re-import is done.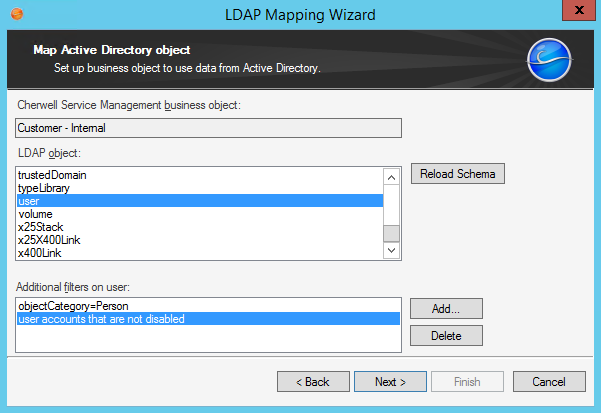
-
Click Next.
- Click Add to add fields to map on the Map fields to LDAP attributes page to open the Map LDAP Field window.
- Click to select the User Attribute.
- Select either:
- New field: Creates a new field. Select an option in the Data Type drop-down and provide the size.
- Existing field: Select this radio button, and then select an already existing field in the drop-down.
- Select the
Auxiliary Attribute radio button and provide the
attribute name. The Auxiliary attribute
text box extends the mapping functionality to allow entry of an attribute name
that is not structurally defined on the selected LDAP class but should be
included in the mapping process.

-
Click Finish.
The Map Wizard closes and the Business Object Properties window opens.
- Publish the Blueprint.
- Import Customers by Importing Directory Services Data into the Business Object.